


Home › Forums › BulletProof Security Pro › Plugin Firewall Help Info
Tagged: Plugin Firewall
- This topic has 67 replies, 18 voices, and was last updated 12 months ago by
AITpro Admin.
-
AuthorPosts
-
AITpro Admin
Keymaster Plugin Firewall General Information
Plugin Firewall AutoPilot Mode
AutoPilot Mode automatically detects and creates Plugin Firewall whitelist rules. AutoPilot Mode logs any new Plugin Firewall whitelist rules that were created in your BPS Pro Security Log. Your BPS Pro Dashboard Status Display displays the next scheduled Cron check for any new Plugin Firewall whitelist rules: PFW: AutoPilot : 5 Min : 10:56 AMThe Plugin Firewall .htaccess file blocks external/remote access to your plugins folder and files. If Plugin Firewall AutoPilot Mode is turned On, it will automatically detect and create any additional or new Plugin Firewall whitelist rules in real-time for frontloading website plugin scripts that need to be whitelisted for website visitors. Your Public IP Address (ISP) is whitelisted by default to allow only your IP address unrestricted access to all plugin folders and files. When your Public IP Address changes the Plugin Firewall .htaccess file will be updated automatically with your new Public IP address.
Whitelisting frontloading plugin scripts allows those whitelisted plugin scripts to load on the frontside of your website for any IP address. This is completely safe to do since only the frontloading plugin script that you whitelist in the Plugin Firewall will load on the frontside of your website for all IP addresses (website visitor IP addresses) and all other plugin files will still remain protected/not accessible behind the Plugin Firewall to any other IP addresses except for your IP address.
List of common things that can break the Plugin Firewall and cause various secondary issues|problems
Minify Plugins: If you are using a Minify plugin then you will probably not see Security Log entries / alerts. Most if not all minifying plugins allow you to choose to exclude plugin scripts that you do not want to minify. If you want to use the BPS Pro Plugin Firewall then you can choose not to minify particular plugin scripts so that you can use both minifying and the Plugin Firewall together. It is recommended that you turn Off/deactivate minifying to get the plugin scripts that need to be whitelisted in the Plugin Firewall. After you have added those plugin scripts to your Plugin Firewall whitelist you can then exclude those same plugin scripts from being minified in your minify plugin and turn On/activate your Minify plugin. Note: If you are using a Minify plugin and you do not want to exclude any js plugin scripts then you CANNOT use the Plugin Firewall due to the way plugin scripts are minified. You cannot add plugin scripts manually or whitelist the Minify plugin’s folder or use the Plugin Override tool either due to the way the true origin of the plugin scripts are combined / minified. The Plugin Firewall is completely optional – you can turn it On or Off.
Cloudflare Plugins: Cloudflare breaks the BPS Pro Plugin Firewall, which in turn breaks BPS Pro Login Security and other things. Important Note: This only appears to be caused by installing WordPress Cloudflare plugins and not when installing Cloudflare from your web host control panel or directly from the Cloudflare website. The solution is to whitelist the Cloudfare IP address range in the BPS Pro Plugin Firewall > Plugin Firewall Additional Whitelist Tools > Whitelist by Hostname (domain name) and IP Address text box > https://forum.ait-pro.com/forums/topic/cloudflare-login-security-and-plugin-firewall-not-working/
BPS menu tabs not displaying correctly, visual format is broken, CSS format is broken
Solution:Other plugins or themes loading their js scripts in BPS plugin pages:
The Script|Style Loader Filter (SLF) In BPS Plugin Pages option under Setup > UI|UX Settings > SLF On setting may or may not fix the problem. In some cases the Plugin Firewall cannot be used with some plugins or themes if BPS cannot prevent them from loading their scripts in BPS Pro plugin pages and breaking the Plugin Firewall.Troubleshooting: Reset|Clear The Plugin Firewall (fixes most if not all Plugin Firewall issues/problems)
Note: To find out if an issue/problem is related to or being caused by the Plugin Firewall do BPS Pro troubleshooting step #3 in the BPS Pro troubleshooting link: https://forum.ait-pro.com/forums/topic/read-me-first-pro/#bps-pro-general-troubleshootingMaintenance Mode Feature or Plugin or Theme Maintenance Mode Feature:
Depending on how the Maintenance Mode feature is designed|works in another plugin or theme, it can prevent the Plugin Firewall from working correctly. So the temporary workaround is to keep the Plugin Firewall turned Off while the site is in Maintenance Mode and then once the site is out of Maintenance Mode then the Plugin Firewall can be activated|turned on. Note: Your site should be protected by the Maintenance Mode Feature or Plugin or Theme Maintenance Mode Feature so there is no need to worry about having the Plugin Firewall turned off.Regular Expressions (Regex) – Using Regex to Create Plugin Firewall Whitelist Rules
All of the standard Regex characters can be used to create custom whitelist rules. Regex is short for Regular Expression. See this very nice website that explains Regex for beginners to super advanced techo coding nerds. http://www.regular-expressions.info/tutorial.html
/plugin-folder-name1/js/some-plugin-script.js
To whitelist all .js scripts in the above example plugin folder you would use (.*) which means match anything / any file name that has a .js file extension.
/plugin-folder-name1/js/(.*).js
Let’s say you have several plugin scripts that need to be whitelisted and each plugin has several js scripts that need to be whitelisted. You would use Regex to simplify the your Plugin Firewall whitelist rules. It is very safe to whitelist js scripts. Hackers target php scripts and use them to inject code into js files.
/revslider/rs-plugin/js/(.*).js, /screets-chat/assets/js/(.*).js, /contact-form-7/includes/js/(.*).js, /seriesengine_plugin/css/se_styles.php, /seriesengine_plugin/js/(.*).js, /all-in-one-event-calendar/app/view/admin/js/(.*).js, /easy-fancybox/easy-fancybox.css.php, /easy-fancybox/(.*).js, /jquery-collapse-o-matic/js/(.*).js, /toggle-box/js/(.*).js, /easy-wordpress-donations/includes/css/progress-bar.css.php, /media-element-html5-video-and-audio-player/mediaelement/(.*).js, /easy-timer/libraries/(.*).js
Plugin Firewall Question Mark help button info
Forum Help Links & Video Tutorials:
Setup Wizard Video Tutorial
Security Log Video Tutorial
Security Log Forum Link
Plugin Firewall Forum Link
BPS Pro Troubleshooting StepsPlugin Firewall Setup using the Setup Wizard
1. Run the Pre-installation Wizard & Setup Wizard.
Note: Plugin Firewall AutoPilot Mode is turned On by default when running the Setup Wizard (unless you have turned AutoPilot Mode Off) and the AutoPilot Cron check is set to 15 minutes.Plugin Firewall Manual Setup Steps
1. Copy and paste plugin scripts/whitelist rules to the Plugins Script|File Whitelist Text Area.
2. Click the Save Whitelist Options button.
3. Turn AutoPilot Mode On.
4. Click the Activate button to activate the Plugin Firewall.Plugin Firewall Test Mode
Clicking the Test Mode button will allow you to check the frontend of your website as if you are visitor to your website to check for any problems or errors. You do not need to check the backend wp-admin Dashboard of your site. AutoPilot Mode is also enabled when you are in Test Mode. Plugin Firewall AutoPilot Mode will automatically create any new Plugin Firewall whitelist rules (once every 1 minute in Test Mode) for frontloading plugin scripts on the frontend of your website while Test Mode is turned On. Clicking the Plugin Firewall Activate or Deactivate button turns Off Plugin Firewall Test Mode. The BPS Pro Dashboard Status Display will display: PFW: Test Mode : 1 Min : 00:00 AM when Test Mode is turned On.Plugin Firewall Test Mode Example Usage:
If you have these example plugins installed: WooCommerce, NextGen Gallery and Contact Form 7 then you would visit/click your main WooCommerce store pages: Shop, Cart, Checkout, Registration and My Account, visit/click you NextGen Gallery page and visit/click your Contact Form 7 contact page/form. If you do see a problem or error, wait 1 minute and check the problem or error again. AutoPilot Mode/Test Mode is designed to automatically create new Plugin Firewall whitelist rules for any problems or errors that are detected when the next Plugin Firewall AutoPilot Mode Cron job runs (once every 1 minute in Test Mode). You can also check the actual functionality of plugins, but normally that should not be necessary to do. After you are done using Test Mode, you can either leave the AutoPilot Mode Cron Check Frequency setting to 1 minute or you can change the Cron Check Frequency to a different Cron check frequency setting.Plugin Firewall Whitelist Tools
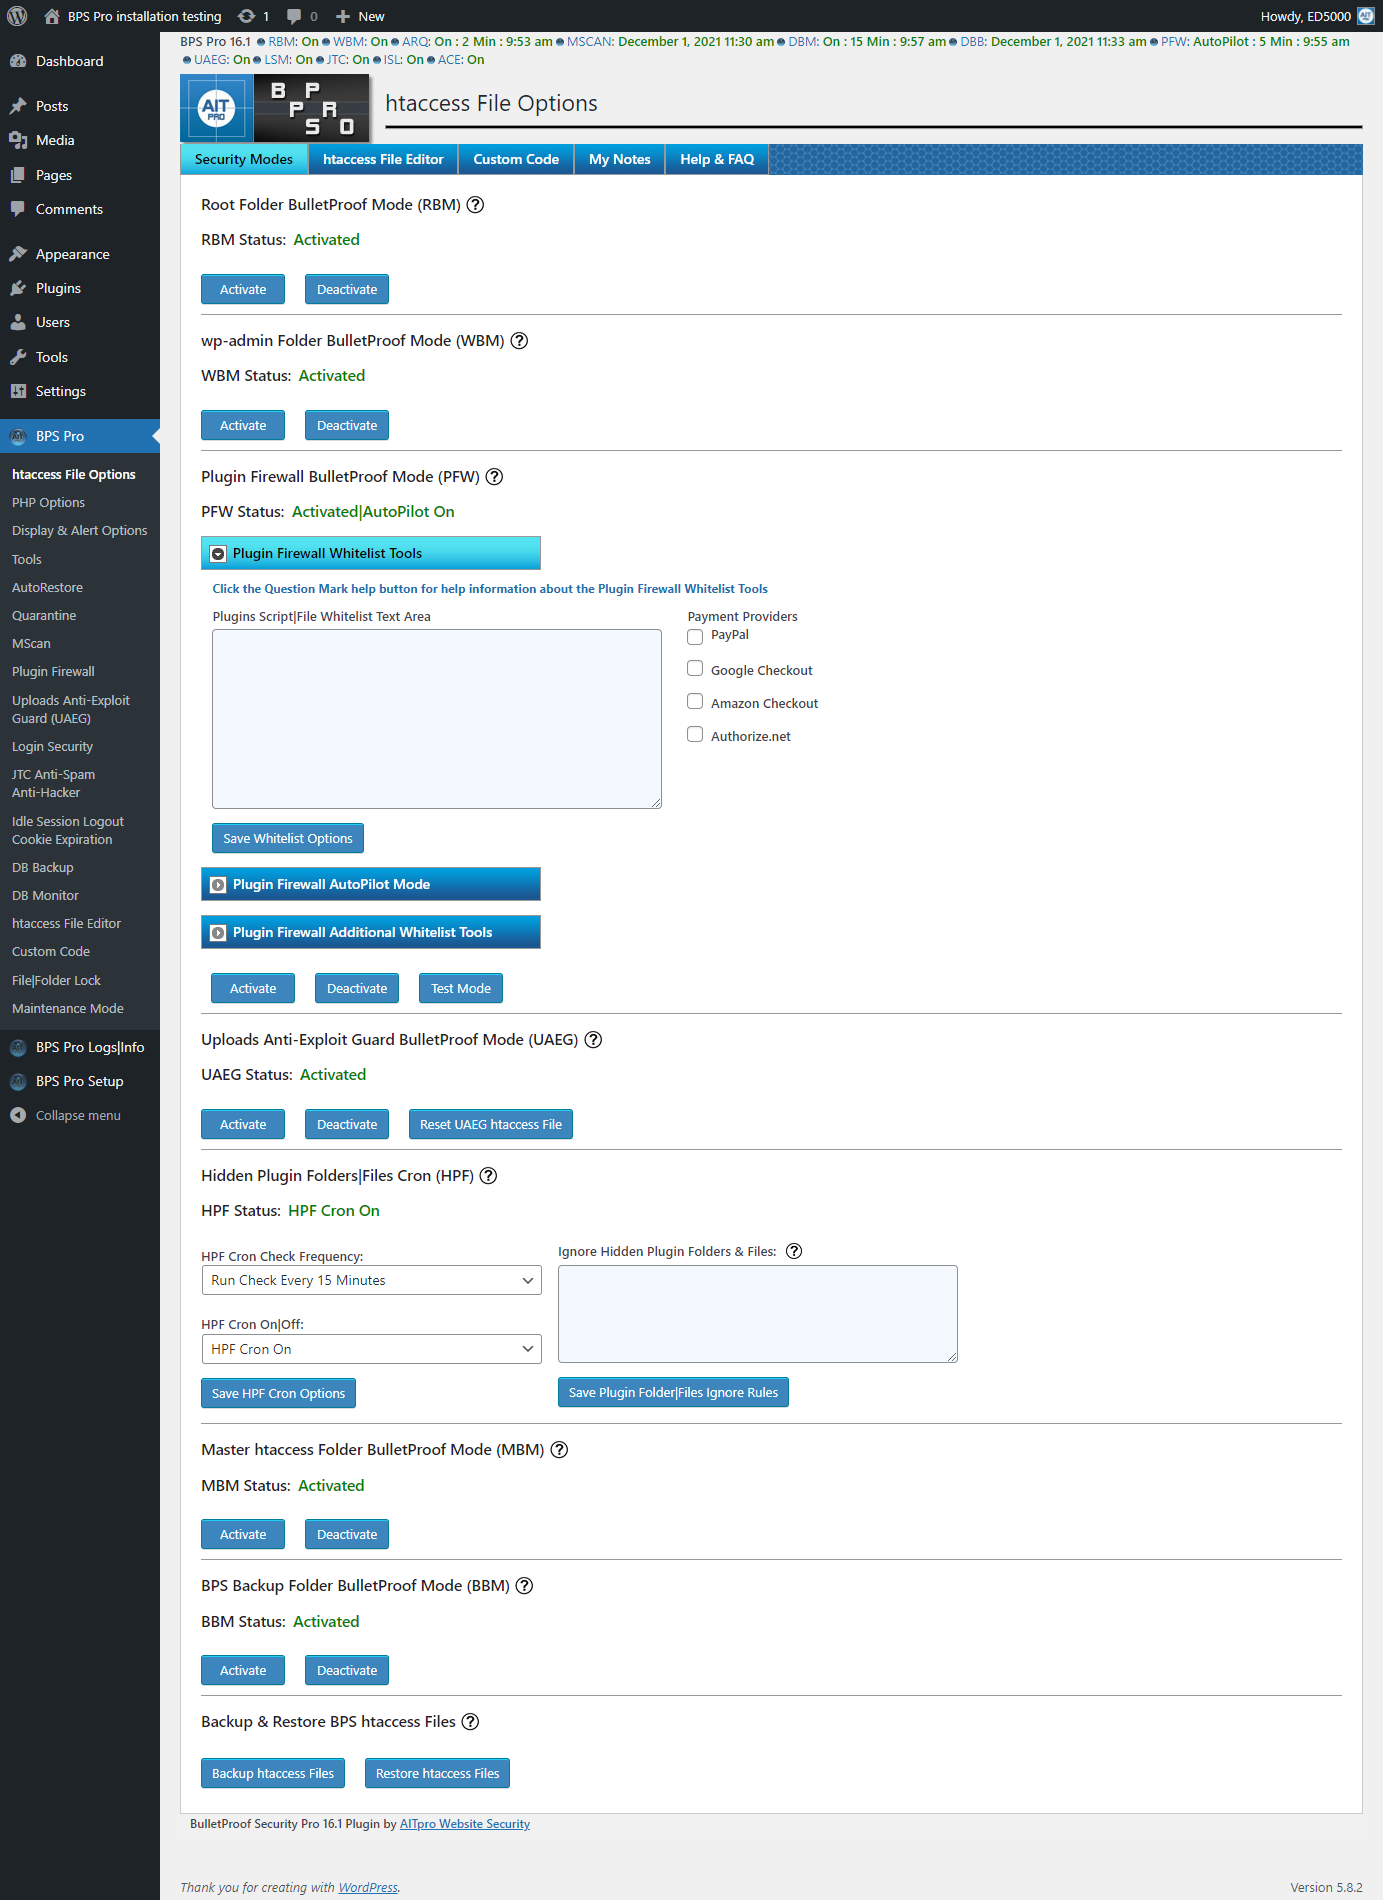
Plugins Script|File Whitelist Text Area
This text area is where you add any plugin scripts that need to be Whitelisted in your Plugin Firewall. Note: AutoPilot Mode creates plugin script whitelist rules automatically. When you click the Save Whitelist Data button this saves anything that you have added in this text area to your database. You can add and remove plugin scripts at any time and then click the Save Whitelist Options button to save your changes. After saving your changes you click the Activate button.Payment Providers – Payment Gateway Providers
If you have a Shopping Cart plugin or other plugin that needs to communicate/receive payment transaction data then check the Payment Gateway Provider checkboxes (PayPal, Google Checkout, Amazon Checkout and Authorize.net) that your Shopping Cart plugin or other plugin needs to communicate with and receive transaction data from. If you want to add additional Payment Provider hostnames/domains/websites or IP addresses you can add additional Whitelist rules for additional hostnames/domains/websites and IP addresses that you want to whitelist. See the Plugin Firewall Additional Whitelist Tools – Whitelist by Hostname (domain name) and IP Address help section for additional details and examples.Save Whitelist Options button
Saves plugin scripts that you have added in the Plugins Script|File Whitelist Text Area and Payment Provider options you have selected to your database. Note: AutoPilot Mode creates plugin script whitelist rules automatically. You can add and remove plugin scripts or Payment Provider options at any time and then click the Save Whitelist Options button to save your changes. After saving your changes you click the Activate button.Plugin Firewall AutoPilot Mode
The BPS Pro Dashboard Status Display will display: PFW: AutoPilot : 00 Min : 00:00 AM when AutoPilot Mode is turned On. The Cron check frequency is displayed and the next Cron check time is displayed. The Plugin Firewall AutoPilot Mode is designed to check your website in real-time for any additional or new whitelist rules that need to be created in the Plugin Firewall. If you install a new plugin and AutoPilot Mode detects that a new Plugin Firewall whitelist rule needs to be created for that plugin then a new whitelist rule will be automatically created in the Plugins Script|File Whitelist Text Area and your Plugin Firewall htaccess file. When a new Plugin Firewall whitelist rule is detected and created in your Plugin Firewall htaccess file it is logged in your BPS Pro Security Log.Example Plugin Firewall AutoPilot Mode Security Log entry:
[Plugin Firewall AutoPilot Mode New Whitelist Rule(s) Created: November 3, 2014 – 11:32 am]
Whitelist Rule: /nextgen-gallery/products/photocrati_nextgen/modules/ajax/static/persist.js
Whitelist Rule: /nextgen-gallery/products/photocrati_nextgen/modules/ajax/static/ajax.js
Whitelist Rule: /cforms/js/cforms.js
Whitelist Rule: /nextgen-gallery/products/photocrati_nextgen/modules/lightbox/static/lightbox_context.js
Whitelist Rule: /nextgen-gallery/products/photocrati_nextgen/modules/ajax/static/ngg_store.jsAutoPilot Mode Cron Check Frequency:
Choose how often the AutoPilot Mode Cron Check should be performed. Every 1 minute, Every 5 Minutes, etc. The Default Cron Frequency Check is set to 15 minutes by the Setup Wizard. You can of course change this to any other Cron frequency checking time that you want to use. Running a Cron check every 15 minutes is probably the best setting to use.Turn On|Off AutoPilot Mode:
Turn the Plugin Firewall AutoPilot Mode Cron Check On or Off. You can turn AutoPilot Mode On or Off as needed or just leave it turned On or Off.Plugin Firewall Additional Whitelist Tools
Whitelist by Hostname (domain name) and IP Address
This option is for adding additional whitelist rules to whitelist additional Hostnames (domain names) or IP addresses in your Plugin Firewall .htaccess file. Example whitelist rules: example.com will whitelist the example.com hostname/domain name. 100.99.88.77 will whitelist IP address 100.99.88.77. Whitelist rules are separated by a comma and a space. Example: example.com,100.99.88.77, example-2.com. After clicking the Save Hostname and IP Address Rules button, click the Activate button to activate the Plugin Firewall again.Additional Roles IP Whitelist
This option is for folks who have additional Administrators, Editors, Authors and Contributors who log into the website to create Posts or perform other website tasks. When you select and save additional Roles this means that any person with the Role capabilities that you have selected will have their IP addresses automatically Whitelisted when they log into the website. If your website is using/has Custom User Roles, your Custom User Roles will be displayed in a scrollable box below the standard WP User Roles: Administrator, Editor, Author, Contributor.Notes:
If you are using a Minify plugin then you will not see any Security Log entries due to the general way that a minifying plugin works. Most if not all Minify plugins allow you to exclude plugin scripts from being minified. You will need to create exclude rules in your Minify plugin for whatever plugin scripts cannot be minified in order for them to be whitelisted successfully in the Plugin Firewall.Plugin Firewall AutoPilot Mode automatically adds/creates Plugin Firewall whitelist rules in real-time. This is a completely automated process. You should not need to check for and add Plugin Firewall whitelist rules manually unless you have AutoPilot Mode turned Off.
The Plugin Firewall blocks external/remote access to plugin files that are located in the plugins folder. If you have a script/file outside of the plugins folder then you do not need to Whitelist it. Your Public IP Address (ISP) is whitelisted by default to allow only your IP address unrestricted access to all plugin folders and files. When your Public IP Address changes the Plugin Firewall .htaccess file will be updated automatically with your new Public IP address.
When manually creating plugin script whitelist rules, each plugin script/file path that you add MUST be separated by a comma and a space. Example: /plugin-folder-name/example-file-name.js, /example-plugin-folder-name/api/paypal-ipn-script.php, /another-example-plugin-folder-name/example-script-name.php. The path name starts with the plugin folder name (do not add /wp-content in the path name). After manually adding your script/file name path to the Plugins Script|File Whitelist Text Area click the Save Whitelist Options button and click the Activate button.
Plugin Whitelisting rules use standard Regex characters. For example you could Whitelist all .js files in a particular plugins folder by creating this whitelist rule: /example-plugin-folder-name/(.*).js. The (.*) Regex characters mean match anything. The rule says match any file name in the /example-plugin-folder-name/ folder that is a .js file.
If invalid whitelist rules are detected the Plugin Firewall will be automatically deactivated/turned Off to prevent causing any problems for your website. Your saved whitelist rules will not be deleted. An error message will be displayed with an exact description of what the problem is with the whitelist rule or rules that need to be fixed/corrected. Fix/correct the invalid whitelist rule or rules and do the Plugin Firewall Manual Setup Steps.
Activating the Plugin Firewall BulletProof Mode for your Plugins folder copies and renames the plugins.htaccess file located in the /plugins/bulletproof-security/admin/htaccess/ folder to your /plugins folder and renames it to just .htaccess. To manually edit the Plugin Firewall .htaccess file go to the htaccess File Editor page and click on the Plugins htaccess File tab.
You can add additional Whitelist rules for additional Payment Providers, hostnames/domains/websites and IP addresses that you want to whitelist. See the Plugin Firewall Additional Whitelist Tools – Whitelist by Hostname (domain name) and IP Address help section for additional details and examples.
What does Whitelist/Whitelisting Plugin Scripts Mean? Whitelisting plugin scripts means that you are creating exceptions or exclusion rules that tell the Plugin Firewall to allow those plugin scripts to load publicly on the front end of your website so that those plugin scripts will function normally and not be blocked by the Plugin Firewall for visitors to your website.
You can check your BPS Pro Security Log to see if any plugin scripts are being blocked by the Plugin Firewall and those plugin script paths to the Plugins Script|File Whitelist Text Area. If you are using a Minify plugin then you will NOT see any plugin script errors in your Security Log file unless you have excluded those plugin scripts from being minified in your Minify plugin.
Tools cURL Multi Page Scanner
The cURL Multi Page Scanner tool is located in BPS Pro Tools. This is an older Pro-Tool that is a predecessor of AutoPilot Mode, but may be useful in certain cases. AutoPilot Mode should find and create all plugin script whitelist rules automatically. So using the cURL Multi Page Scanner Pro-Tool should not be necessary. The Multi page cURL Scan Tool scand the total number of Pages and Posts that you enter in the Limit Number Of Pages To Scan text box. The default scan is already set to scan up to 50 Pages/Posts. This scanner is designed to look for plugin scripts to add to the Plugin Firewall Whitelist. This scanner has been tested up to scanning 1500 website Pages & Posts simultaneously.Troubleshooting The Plugins htaccess File
Plugin Firewall AutoPilot Mode is designed to automatically correct most issues or problems. To check if the Plugin Firewall is causing another plugin not to work correctly or blocking a plugin script/file check your BPS Pro Security log file for 403 Errors. The script/file name and path will be listed in your Security log if it is being blocked. You can then add this plugin script/file name to the Plugins Script|File Whitelist Text Area to whitelist this plugin script/file name, click the Save Whitelist Options button and click the Activate button.To turn Off the Plugin Firewall click the Deactivate button. Test the plugin that was having a problem and if the problem is still occurring then the Plugins Firewall BulletProof Mode is not causing the problem. Click the BPS Pro Troubleshooting Steps link at the top of this Question Mark help file for additional BPS Pro troubleshooting steps.
########################################################################
Older Obsolete Help Info: All help information below this point is no longer relevant
########################################################################Fix all general Plugin Firewall issues/problems:
1. Go to the BPS Security Log page and click the Delete Log button to delete your current Security Log file contents.
2. Go to the Plugin Firewall page.
3. Click the Plugin Firewall BulletProof Mode Deactivate button.
4. Delete (or cut if you want to add your existing whitelist rules back into the Plugins Script|File Whitelist Text Area) all of your Plugin Firewall whitelist rules out of the Plugins Script|File Whitelist Text Area.
5. Click the Save Whitelist Options button.
6. Click the Plugin Firewall Test Mode button.
7. Check your site pages by clicking on all main website pages: contact form page, home page, login page, etc.
8. Recheck the Plugins Script|File Whitelist Text Area (after 1 minute) and you should see new Plugin Firewall whitelist rules have been created.
9. Change the AutoPilot Mode Cron Check Frequency to 15 minutes or whatever frequency time you would like to use.
10. Click the Plugin Firewall Activate button.Fix all general Plugin Firewall issues/problems and Proxy server configuration mistakes:
Note this fix also applies to using a VPN|Proxy when you are logged into your website.
Additional steps to fix both general Plugin Firewall issues/problems and to compensate for an additional Proxy server configuration mistake (whitelist the Proxy IP Address). Note: This only applies to Proxy server issues/problems. Use the steps above unless specifically instructed to use these steps below to fix/whitelist a Proxy server IP address problem.1. Go to the BPS Security Log page and click the Delete Log button to delete your current Security Log file contents.
2. Go to the Plugin Firewall page.
3. Click the Plugin Firewall Additional Whitelist Tools accordion tab.
4. Enter Proxy server IP address: xxx.xxx.xxx.xxx in the Whitelist by Hostname (domain name) and IP Address text box.
Note: If you are using Cloudflare click this link: Cloudflare Proxy server IP addresses
5. Click the Save Hostname and IP Address Rules button.
6. Click the Plugin Firewall BulletProof Mode Deactivate button.
7. Delete (or cut if you want to add your existing whitelist rules back into the Plugins Script|File Whitelist Text Area) all of your Plugin Firewall whitelist rules out of the Plugins Script|File Whitelist Text Area.
8. Click the Save Whitelist Options button.
9. Click the Plugin Firewall Test Mode button.
10. Check your site pages by clicking on all main website pages: contact form page, home page, login page, etc.
11. Recheck the Plugins Script|File Whitelist Text Area (after 1 minute) and you should see new Plugin Firewall whitelist rules have been created.
12. Change the AutoPilot Mode Cron Check Frequency to 15 minutes or whatever frequency time you would like to use.
13. Click the Plugin Firewall Activate button.Note: Checking all the User Roles checkboxes under the Additional Roles IP Whitelist option setting will fix various Proxy Server issues. Location: Plugin Firewall > Plugin Firewall Additional Whitelist Tools accordion tab/button > Additional Roles IP Whitelist > check all the User Role checkboxes > click the Save Additional Roles Options button.
Checking Your Security Log For Plugin Scripts To Manually Add To The Whitelist
If a plugin script is being blocked by the Plugin Firewall then a Security Log entry will be made and you can manually copy the plugin script path found in your Security Log to the Plugins Script/File Whitelist Text Area. An Example of a Security Log entry for a plugin script that needs to be manually Whitelisted is shown below. You would copy this plugin script path – /bbpress/bbp-theme-compat/js/topic.js – to the Plugins Script/File Whitelist Text Area, click the Save Whitelist Options button and click the Plugin Firewall BulletProof Mode Activate button.When you click the Save Whitelist Options button this permanently saves the plugin script path to your WordPress Database. If you have additional plugin script paths that need to be added to the Plugins Script/File Whitelist Text Area you would repeat the steps of copying the plugin script path from your Security Log and pasting it into your Plugins Script/File Whitelist Text Area and once you have all plugin script paths added and saved then you would click the Plugin Firewall BulletProof Mode Activate button.
This is the Plugin Script path that you would add to the Plugins Script/File Whitelist Text Area /bbpress/bbp-theme-compat/js/topic.js based on the Security Log error below.
>>>>>>>>>>> 403 Error Logged - January 19, 2013 - 12:10 pm <<<<<<<<<<<
REMOTE_ADDR: 94.44.197.195
Host Name: apn-94-44-197-195.vodafone.hu
HTTP_CLIENT_IP:
HTTP_FORWARDED:
HTTP_X_FORWARDED_FOR:
HTTP_X_CLUSTER_CLIENT_IP:
REQUEST_METHOD: GET
HTTP_REFERER: https://forum.ait-pro.com/forums/topic/read-me-first-free/
REQUEST_URI: /wp-content/plugins/bbpress/bbp-theme-compat/js/topic.js?ver=2.1.2
QUERY_STRING:
HTTP_USER_AGENT: Mozilla/5.0 (Windows NT 6.1; WOW64; rv:17.0) Gecko/20100101 Firefox/17.0
Other Examples Of Checking The Security Log For A Plugin Script That Needed To Be Whitelisted Can Be Found in The Links Below
https://forum.ait-pro.com/forums/topic/contact-form-7-plugin-firewall-security-log-403-error/
https://forum.ait-pro.com/forums/topic/bulletproof-5-5-pro-and-the-new-error-messages/-
This topic was modified 4 years, 7 months ago by
Tony Payne
ParticipantI am having a problem with the Plugin Firewall Test Mode. When I set Test Mode on and run a test, I get a new tab that says:
shopinflorida.com 403 Forbidden Error Page
If you arrived here due to a search or clicking on a link click your Browser’s back button to return to the previous page. Thank you.Not sure why this is occuring or how to fix it.
Thanks.
Tony PayneKeymasterRefresh your Browser and the 403 error should go away. Do you have BPS Pro 6.0 installed? BPS Pro 6.0 has a Setup Wizard that does the Plugin Firewall setup automatically. Also a new simpler/easier cURL scan tool has been added to the Plugin Firewall tools.
ParticipantThanks for the rapid response. I had just upgraded to BPS Pro 6.0, had a few problems with the WP-Admin .htaccess breaking the site (500 errors) but used the troubleshooting guide to fix that and used the wizard to setup the Plugin Firewall. Let me test again and will refresh the browser. Drat it was as easy as that! Seems to work now.
Great response as always.
Schneider
ParticipantOne comment from my side trying to fix multiple 500 errors to css- and js-files:
I made a typo in my custom-firewall-list where I wanted to exclude several files:/someplugin/js/.(*).js
Notice that the dot is outside the brackets.
This caused also firewall-testmode to generate a 403 error. In the HTTP-logs a lot of 500 errors were tracked.
So I recommend checking for such a stupid typo as well. 🙂Paul
ParticipantReading an answer to a question i had posed.
“The Plugin Firewall .htaccess file blocks external/remote access to your plugin folder and files. There are 5 whitelisted (allowed) conditions/rules by default: Your domain name, Your Server IP Address, Your Computer IP Address/Public IP Address, the BPS Pro 400 Error logging/tracking file and the BPS Pro 403 Security logging/tracking file.When your Public IP Address changes the Plugin Firewall .htaccess file will be automatically updated with your new Public IP address. ”
Does this get generated when you log in i assume it must be then?
And this bit
external/remote accessSo would this prevent ftp access if my IP changed without logging in to update it? (assume this is remote access)
KeymasterYes. The automated Plugin Firewall IP address update function requires that you are an Administrator in order to update the IP address. So that would mean that you would have to be logged into your website as an Administrator.
External/Remote access refers to Public accessibility to the WordPress /plugins/ folder. ie no one can publicly access, view or see any of your plugin files in your /plugins/ folder. Some plugins have frontloading plugin scripts that need to be publicly accessible to anyone/everyone in order for that plugin to work correctly. That is where Plugin Firewall whitelisting comes into play. You are whitelisting those frontloading plugin scripts so that they are publicly accessible to anyone and so that that plugin functions normally.
BPS does not and actually cannot affect either FTP or your Web Host Control Panel since these things are specifically controlled solely by your Host Server and cannot be affected by anything else.
ParticipantI have set up my plugin firewall on new site but i keep getting
bulletproof-security/admin/js/bps-ui-tabs.js?in error log. I lose formatting in bps and if i add that to whitelist i can’t as it is a bulletproof-security directory. Run the setup again and everything passes okKeymasterDo you have the most current version of BPS Pro 10.5 installed? If not, install the latest version of BPS Pro.
Do these steps:
1. Go to the Security Log page and click the Delete Log button to delete/clear the BPS Security Log.
2. Go to the Plugin Firewall.
3. Click the Plugin Firewall BulletProof Mode Deactivate button.
4. Click the Save Whitelist Options button.
5. Click the Plugin Firewall BulletProof Mode Activate button.ParticipantHi, I did have version 10.5 installed but updated to 10.6 today
Did what you suggest, ok at the moment, will report back if i get error again. BTW i,m getting no email notification of replies?KeymasterOk great. Yep I do not receive email notifications either in BuddyPress/bbPress sticky topics. It is on my list of things to check out at some point.
Living Miracles
ParticipantI was testing out the functionality of the “Additional Roles IP Whitelist” yesterday, and just wanted to get clear on something.
If I understand correctly, the only function of the Additional Roles IP Whitelist is that any additional Admins, Editors, Contributors, etc. are abe to log in to the website via the /wp-admin login form without getting blocked (i.e. they are being whitelisted automatically when logging in vs. only the Admin user being whitelisted automatically when logging in). Those other user roles do not get any other additional benefits aside from this one, and the normal WordPress permissions for those rules still apply (i.e. the Editor role still only has the default WordPress Editor capabilities and cannot perform functions that an Admin can)…
I also seem to understand then, on the contrary, if an additional user role is not whitelisted in the Additional Roles IP Whitelist, they would not be able to login via the login form at all. And this would be with all other users except the Admin (e.g. there may be other users setup in WordPress, like another Admin, an Editor, or Contributor, and even though those users are there, they will not be able to use the login form, unless either their “personal” IP address is whitelisted or we whitelist the User Role). Is this correct?
If all of this is how it works, then I’d like to mention that, when testing this Additional Roles IP Whitelist yesterday, I set up a test Editor user; I logged out of WordPress as the Admin, then logged in with the Editor user, and I was able to log in just fine even though I had not whitelisted the Editor role in the Additional Roles IP Whitelist. Is that normal behavior? If so, then I just don’t understand this particular Whitelist, and would love to get an explanation.
Thank you.
KeymasterYep, the Additional Roles IP Whitelist functionality is somewhat of a grey area that needs to be stated/explained more clearly in the help text. The overal concept is this: The Plugin Firewall automatically updates the IP address of anyone who is logged in so that person’s IP address is updated in real time. If 2 people are logged in at the same time no matter what their Roles are then it is important to use this Option so that both IP addresses are being added/updated and not competing with each other. Basically another IP address whitelist rule is created to whitelist any additional IP addresses in real time no matter what the Role of that “other” user is. Typically most folks are the sole Administrator of a website and no one else is logging into the site either at the same time or at different times. So if you have several people logging into your site then you would use this option to make sure their IP addresses are being whitelisted in real time.
Additional Roles IP Whitelist
This option is for folks who have additional Administrators, Editors, Authors and Contributors who log into the website to create Posts or perform other website tasks. When you select and save additional Roles this means that any person with the Role capabilities that you have selected will have their IP addresses automatically Whitelisted when they log into the website.ParticipantThank you! Some questions:
What happens when IP addresses are “competing” with each other? Does one get logged out?
Without selecting addition roles in the Additional Roles IP Whitelist we have had two people logged in at the same time with different roles from different IP addresses, and there was no apparent conflict. Also, same setup, we generally have two people with different IP addresses logged into the same Admin user at the same time as well, without conflict.
In other words, we’ve done a few different tests and those checkboxes in the Additional Roles IP Whitelist haven’t seemed to affect anything. How can we see the effect of those checkboxes? For example, someone not being able to log in due to a checkbox not being checked.
KeymasterIf IP addresses are competing with each other than when an ip address is updated in real time it is changed to the other person’s ip address. So instead of having ip addresses changed back and forth in real time, which actually still kind of works, it is better to have 2 separate ip address lines of code for each user that is logged in. The real time ip address update happens instantly so for a millisecond your ip address would not be whitelisted, but as soon as you do anything it would be automatically updated and whitelisted again. That is where “competing” comes in to play.
When you select and use the Additional Roles IP Whitelist tool it creates new lines of IP address whitelisting code per person that is logged in based on their Role.
-
This topic was modified 4 years, 7 months ago by
-
AuthorPosts
- You must be logged in to reply to this topic.